Wearable Planter

Jewelry and Accessories for Green Thumbs

What We're Making

Put a Plant on it! Where to Find Plants in Atlanta

What We're Making, How to Plantcolleen jordanComment
Small succulents from Pike Nursery in Atlanta.

Small succulents from Pike Nursery in Atlanta.

With the holidays right around the corner, we thought this would be a good time to share with you some of our favorite places to pick up plants, and where we find the small ones that you see us use in our planters. Since we're based in Atlanta*, we're most familiar with the places to find plants locally, and we'd like to share our recommendations with you!

Southeast Succulents
at The Collective, 723 Lake Avenue Northeast, Atlanta, GA, 30307
at Whole Foods on Ponce, 650 Ponce De Leon Ave NE, Atlanta, GA 30308

One of our favorite places to pick up the succulents that you see us use for our photos is Southeast Succulents! They sell their succulents at a few places around Atlanta, mainly the Collective in Inman Park and at Whole Foods Markets. In addition to plants, they also sell potting soils for succulents, and other decorative terrarium supplies.
 

Visiting Gardenhood in the fall.

Visiting Gardenhood in the fall.

Gardenhood
353 Boulevard SE, Atlanta, GA 30312
Gardenhood is a nursery that sells a variety of plants in the Grant Park neighborhood of Atlanta. We like to buy succulents there, and they sell a selection of indoor and outdoor varieties. In addition to succulents, you can also find potting soils, garden decorations, and plants for landscaping at this nursery.

Hall's Atlanta Wholesale Florist
630 Angier Ave NE, Atlanta, GA 30308
Hall's is mainly a wholesale florist, but they also sell plants such as succulents (our favorite plants to use for our planters) and house plants. In addition to plants, they also sell other floral items that you might need for floral arrangements or decorating events. If you're shopping for flowers for a wedding or event, stop by here to pick up your flowers and the other vases and accessories you might need!

Pike Nurseries
Several locations in the Atlanta Area
Pike Nurseries is an Atlanta based chain of nurseries. While most people know them for their large selection of landscaping plants, they also carry a large variety of succulents and tillandsia (air plants).

If you have any nursery recomendations here or in other cities, please let us know and we'd love to share them!

*As a note, this list is not comprehensive of all of the places to find plants in and around Atlanta, but these are the businesses that we know and recommend. If you have another business to recommend for this list, please let us know! Also, large chain stores are not included in this list, only small and Atlanta based businesses. Larger stores will be included in a later post.


Prototyping with MakerBot

DIY, What We're Makingcolleen jordanComment
Planters prototyped in warm grey PLA hold rosemary from our roof garden.

Planters prototyped in warm grey PLA hold rosemary from our roof garden.

We've written before about prototyping with MakerBot and other home 3D printers over the last two years. For the planters that we sell here on our site and on Etsy, we prefer to use commercial 3D printers like Shapeways and Ponoko, but for prototyping, using a desktop 3D printer better suits our needs. Prints can be made in less than an hour (no waiting for a week for prints!), and I can immediately make changes to file if I see a change that needs to be made.

Printing on the Makerbot Z18.

Printing on the Makerbot Z18.

We've been lucky the last few weeks to have access to a MakerBot Z18, the newest of their series, to prototype some of our new forthcoming planters. Before we've printed on their Thing-o-matic and Replicator 2 Machines. The print quality has improved slightly from the earlier models, which is helpful when prototyping small pieces. The main changes with the newer MakerBots is the interface is much more intuitive to use, and now they're capable of printing much larger pieces.

Made with purple PLA.

Made with purple PLA.

Also, these planters were printed in PLA, a plastic made from cornstarch. The material is biodegradable over time, but can warp when exposed to heat, making this material suitable for use for prototyping.

Making and 3D printing on a MakerBot still isn't perfect, but its pretty amazing when you can hold a physical product in your hand that only existed on a computer screen hours before!


Want to see more of what we're making? Follow us on instagram to see our latest projects and experiments.


NEW LOOK FOR OUR SEED BOMBS

What We're Makingcolleen jordanComment
seedbomb-3_grande.jpg

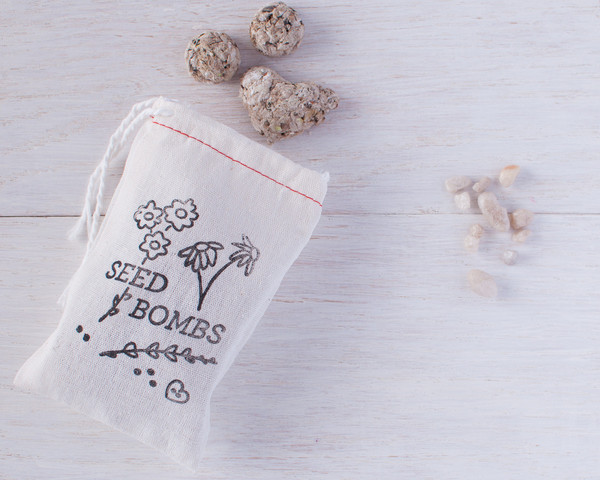
Spring is finally here, and we updated the look of our seed bombs to celebrate! The illustration on the muslin bag depicts three of the flower varieties in the seed mix, Baby’s Breath, Rocket Larkspur, and Purple Coneflower. We also updated the mix of seeds that we use to make our seed bombs, using a mix of annual and perennial wildflower seeds to guarantee you blooms this year and for years to come. The growing regions for this seed mix are regions 1-10, so they are able to grow in most regions of the US. If you’re looking for a quick way to plant some seeds or need a gift for a green thumb, the seed bombs are available in our shop.

HOW TO DYE YOUR 3D PRINTS

DIY, What We're Makingcolleen jordanComment

3D printing is currently a big buzz word in the design, arts and crafts, and technology worlds. We make all of our jewelry with 3D printing, and in the time we've been make 3D printed creations, we've learned a lot about ways to manipulate the material to change its color and appearance. 3D printing is also known as additive manufacturing  and produces objects from CAD files by building up material layer by layer to create the final form. You can 3D print in a wide range of materials from squishy rubber to hard metals. 

Have you created something with 3D printing? A lot of design students and hobbyists now have access to the technology thanks to 3D printing services like Shapeways and Ponoko. If you printed your object in polyamide, you can dye them at home to whatever color you want. Polyamide is a porous material that accepts color really well. Some companies offer dying of your prints for you, but that adds extra processing time and is only available in a small range of colors.

If you're tired of the boring white that many 3D prints come in, we will show you how to add color to your prints. This is a tutorial for dying nylon (or polyamide) 3d prints with fabric dye. This material is known by different names at different printing companies. Shapeways calls it White Strong and Flexible, Ponoko calls it Durable Plastic, Sculpteo White Plastic, and iMaterialise Polyamide. We'll use Rit brand dyes in our tutorial since it is easy to find in craft, fabric, and grocery stores. You can also dye your 3D prints with Jacquard brand acid dyes in a similar process, but that will require carefully measuring vinegar to change the acidity of the solution and constantly heating the solution.

This process is similar to dying fabric with, and we learned a lot about how dye 3D prints by reading this article on dyeing techniques by Rit.

Step 1: Gather Your Materials

The first thing that you will need to do is gather your materials. You'll need your nylon 3D prints, your desired color of fabric dye, a bowl to do the dyeing in, measuring spoons, and boiling water (not pictured). We also recommend having access to a microwave to reheat your solution while dying as need.

Decide which color you would like to dye your prints. Rit has a great guide to tell you which colors you can dye your prints with their dyes and other brands of dye will have similar guides. Nylon absorbs the dye really quickly, and we usually use slightly less dye than the guides recommend. For this batch of bike planters we will be dying them using Rit's Sunshine Orange. We're using 1.5 tsp of powdered dye to 1.5 cups of boiling water.

Remember that you are working with fabric dye that will stain clothes and shoes. So if you care about the clothes that you are wearing wear an apron or change into something that you don't love so much. Fabric dye can also stain your skin, so wear latex gloves if you don't want tinted hands. Rit dye will come off easily with scrubbing, so if you do get some on your skin, it can be easily removed.

Step 2: Soak Your Pieces

3.jpg

Before you begin the dying process, soak your prints for at least 30 minutes. We recommend doing this overnight if you have the time. Having your prints saturated will allow the dye to color the piece more evenly. This will also help remove any dust on the surface of your prints left over from the printing process. If there is residual powder on the surface of your prints, it will affect the color of piece. The powder will be dyed, and will come off easily when the piece is dry, leaving a white spot underneath.

This piece had some leftover powder stuck to it when it was dyed, and you can see the large white area left behind from removing the powder.

Step 3: Add Color

Carefully measure your required amount of dye and add your boiling water. Stir it really well so all of the powder is dissolved in solution.

Add your prints to the the solution and stir. Agitate the solution frequently to ensure that your prints are colored evenly. The longer that you leave your prints in the solution, the more saturated the color will be. These prints stayed in the dye for about 6 minutes to achieve the color. If you need to leave your prints in the solution longer, microwave it at 15-30 second increments to reheat the water to near boiling temperatures. We've noticed that some dyes require higher temperatures to stay in solution than others. In our experience pink and blue dyes require hotter temperatures and longer dying times to achieve their desired colors.

Step 4: Rinse 

8.jpg

Rinsing your prints is very important. You can rinse it with cold water to remove the excess dye. We also like to let the pieces sit in boiling water for a few minutes for any excess dye to soak out. If you're going to be dying jewelry or anything that will be worn close to the skin, this is a very important step as excess dye could stain the skin or clothes.

Step 5: Dry

Step 6 (Optional): Seal

Nylon is a porous material that will readily absorb particles and dirt it is exposed to. We recommend sealing your prints with a polymer varnish (like liquitex) or clear acrylic paint to protect the color and your piece from getting dirty.

Step 7: Show it Off!

 You just put all of this hard work into your 3D Printed object- show it off and tell everyone about it!

MAKE YOUR OWN SEED BOMBS

DIY, What We're Makingcolleen jordanComment

Seed bombs have become very popular recently. They're a fun way to try your hand at gardening without a lot of prep work. Making them is a fun activity that you can do to welcome in spring and is great to do with kids.

These seed balls are made with recycled and biodegradable paper and wildflower seeds. We receive a lot of kraft paper in shipments from our suppliers, and we needed a creative way to reuse it. The paper around them protects them from being eaten by birds and insects while the seeds germinate. Throw them in a space that you think needs some greenery, or in your own yard to start a small garden.

Step One: Gather Supplies and Tools

To make seed bombs, you'll need to first gather your supplies and tools for the job. You'll need:

Recycled Newspaper or kraft paper

water

seeds

mixing bowl

blender or immersion blender

ice cube trays

tea towel

A tray or plate for the seed balls to rest on while they dry

Seeds can be expensive if you buy them in small packets. If you're planning on making more than one batch of these, we recommend buying them online from a store like American Meadows

4.jpg

Step Two:

Shred paper and let it soak in water for 5 minutes or more. This allows the fibers in the paper to absorb enough water to lengthen so it is easier to blend. Add the paper and water mixture to the blender and blend it into a pulp.

Step Three:

Add the seeds to the pulp mixture and stir. To make ours we use a blend of wildflower seeds, but you can use any type of seeds you like, like vegetable seeds or ivy. There's no exact measurement for the amount of seeds you need to use, but we use about 1/4 cup of seeds to 4 cups of the paper pulp mixture.

Step Four:

Strain the pulp through the tea towel. We put ours over a separate mixing bowl to reuse the water to create a second batch later in the day. Wring out the pulp mix in the tea towel to remove more water so the seeds don't germinate prematurely.

Step Five:

Place the paper and seed pulp into your molds. You can make your seed balls as small or as large as you like. Carefully remove from their molds and rest them on a tray or board to dry.

9.jpg

Step Five:

Let dry in a warm and sunny place. You want to make sure that your seed bombs dry quickly so that the seeds don't start to germinate while your seed bombs are still drying.

10.jpg

Step Six:

Spread! Throw your seed bombs in your garden, on your windowsill, or in an ugly lot that you think needs some color.